Monday, August 24, 2009

Activity 14. Pattern Recognition

The goal of this activity is to classify the chosen samples to their respective classes (such as color and size) using Scilab.

Objects with different characteristics were chosen as samples for this activity. In this case, 10 pieces of 2 kinds of soft drink caps and 10 pieces of 25 centavo coins were chosen. The image of the samples were taken and then processed using Scilab. Five samples for each type of object was chosen as the basis of each types color level and size. The image containing 5 samples of each type were converted into a binary image using the im2bw function in Scilab. The sizes of the samples were then computed with the help of the bwlabel function. The mean of the sizes of the different objects were then computed. The color level of each of type of object in the image containing 5 of each type of object were computed. The mean color level (Red channel) and the mean size or area was then compared to the sizes and color levels of the objects in the image containing 10 of each objects.

The original image of the samples along with the binary image is shown below.
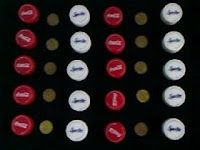

Figure1. Sample Objects

The generated classification graph is shown in Figure 2.

Figure2. Sample Groupings

Figure 2 shows the classification plot of the chosen samples. The x-marks represents the samples while the colored dots represent the basis or the supposed group position. The x-axis position of the group of red caps should be aligned with the position of the group of white caps since they have the same area. This is due to the enlargement of the area of the white caps when the image was converted into a binary image. The areas of the red caps seem to vary more compared to the areas of the other groups.


I give myself 10/10 in this activity.

Monday, August 17, 2009

Activity 13. Correcting Geometric Distortions


An image of a grid line was downloaded from the internet. The image of the grid line exhibited distortion. The dimension of the portion of the grid with no distortion were taken and used to compute and generate the ideal grid. The distorted image is shown in Figure 1.


Figure1. Distorted image

Now, the ideal vertex points can be derived from the distorted image considering Figure 2 and the following equations.

Figure2. Distorted and ideal image


Using the diagram, given equations and the vertices of the distorted image, the ideal grid vertex points were generated using Scilab. The vertices was obtained using the locate function in Scilab. The ideal grid points are shown in Figure 3.


Figure3. Ideal vertex points

The ideal grid was then generated using two methods: the nearest neighbor technique and the bilinear interpolation. The equations shown below were used in generating the ideal grid or image.


The ideal images generated using the two techniques are shown in Figure 4 and Figure 5.


Figure4. Bilinear Interpolation


Figure5. Nearest Neighbor Technique

As seen in the presented images, there is only a slight change on the distorted image after subjecting it to bilinear interpolation and nearest neighbor technique. There are only subtle differences between the images generated using the two techniques but, as expected, the image generated using bilinear interpolation exhibits a less distorted image than the image generated using the other technique. The lines in the image produced using bilinear interpolation is straighter and the gaps between squares are more uniform compared to the lines and spacing of the image generated using the nearest neighbor technique.

In summary, a distorted image was fixed using two different techniques: the bilinear interpolation and nearest neighbor technique. The results showed that the ideal image generated using bilinear interpolation is better than the image generated using nearest neighbor technique.


I will give myself 9/10 for this activity.

***Gilbert helped a lot in fixing the source code for this activity.

Monday, August 3, 2009

Activity 12. Color Image Segmentation

An image was downloaded from the internet. The image was cropped in order to make simulations faster. A patch was selected from the downloaded image and loaded into Scilab. The downloaded image and the patch used is shown below. The patch shown below was resized for better illustration. The original size of the patch is 13x13 pixels.


(image from http://lifehackery.com/qimages/5/used-tennis-balls.jpg)

The histogram of the normalized chromaticity space is shown below. The histogram is useful in the interpretation of the results.


The histogram of the patch is generated using the nonparametric method. The generated histogram is shown below. The historam is in agreement with the histogram shown above since the patch selected is in the green region.

The probability that a pixel with chromaticity r belongs to the patch was computed using the formula shown below. The probability for red and green was computed and used to derive the results for the parametric method.

The parametric segmentation was implemented to the original image. The resulting image generated after the original image was processed using the parametric method is shown below.


The original image was also processed using the nonparametric method. The resulting image is shown below.


From the results generated using the two methods, parametric and nonparametric, it can be observed that the parametric method produced a finer result than the nonparametric method. The enhanced image generated by the nonparametric have more dark regions than the image generated using the parametric method. This may indicate that the nonparametric method is stricter in the selection of areas with the same color level as the selected patch. The white areas in the previous two images represent the areas of the original image with the same color level as the selected patch.

I will give myself 10/10 for finishing this activity.

**Gilbert and Rommel helped a lot in this activity.